Doing up our Drascombe Coaster Aquarius
We bought our 1997 Coaster, No. 280, built by Honnor Marine, from Churchouse boats on a stormy January day. We knew there would be some work to do, but didn't realise just how long it would take!


We noticed there were certain jobs needing doing, such as re-varnishing the mast, which had developed nasty black spots where it had been rubbed by the gunter jaws. We also discovered she was very damp inside, and had no bunk cushions.

We thought the first thing we ought to do would be to check that we could rig her, so one sunny February we got out the spars, sails, lots of bits of rope and a manual! A couple of hours later we took triumphant photographs and imagined ourselves sailing out of my Dad's village upon the trailer! This would at least save diesel when going to work in the mornings, although I can't imagine I'd be welcome tacking up the A69 on the way home in a prevailing westerly!


We mounted the outboard, a Mercury 9.9 2-stroke (oversized really, as Coasters are recommended to carry 6 to 8 HP, unless you’re a hardy Dutch owner, whose engine resembles a couple of long oars) in its well, and with a water butt underneath it got it started, once we had discovered the choke. It ran fine, although we had to keep water running into the butt with a hose while the engine spewed it over the sides. A host of Poole barnacles and other marine life that had found itself a cosy home in the outboard's darker recesses found itself rudely ejected into 'fresh' water.
Antifouling
The next available weekend, and with the fun and excitement of seeing her potential for sailing, we thought we'd better get on with the first actual job. This, we decided, would be to re-antifoul her. She had been lying in Poole Harbour for three years, and we do not think re-painted in all that time. We found that the red antifoul was peeling off in places - out bravely with our scrapers, we attacked the paint, which was flaky in parts, and adhered stubbornly to the hull in others.

After lying on our backs for the first hour or two, we lowered the side bilge rollers on each side to allow us to tilt her to get more comfortable access to one side of her bottom at a time. At the end of two days of real work we had a scraped hull, which in accordance with the excellent Boat Painters Guide from International Paints (available online), we rubbed down with 280 grit sandpaper to allow the new paint to adhere.
An expensive trip to the chandlers (are these trips ever anything else?) procured Primocon and Waterways (fresh water) antifoul. We bought two tins of 750ml of Primocon, but in fact only needed one. The other was returned and the proceeds used against (yet more) items from the Chandlers. It took a couple of hours to apply masking tape to the hull, during which I discovered that Honnor kindly moulded in two faint lines along the hull, I guess the top one is for the top of the boot topping, and the lower is the waterline? Or perhaps they represent the lines for Coasters and Longboats respectively. As the previous antifoul had been applied very roughly to the top line, I copied this and spent a happy, if frustrating, couple of hours sticking masking tape to the top line, finding overlapping short lengths easier than one long one, although going over the chines is a bit of fun!
My father followed me with the Primocon, and that was one day gone. The next day was spent by my parents applying a second coat of Primocon. The boat looked much smarter already.
Days three, four and five were also spent by my (retired!) Mum and Dad applying the Waterways antifoul, the red colour contrasting beautifully with the white hull. They made a great job of this.

Interior cabin and electrics
My Dad and I had had a happy evening selecting equipment from a mail order catalogue, and deciding to go down the 'techy' route, he ordered a NASA Clipper Duet combined log and echosounder, hand-held VHF and lots of other gear.
Once the equipment was delivered my next weekend was spent cutting merciless holes in the hull (for the log). This, after advice from Stewart Brown of Churchouse Boats, was placed on the starboard side, inside the deck locker, as far forward and toward the centreline as possible, but avoiding the thickened areas of fibreglass (and thus rapped knuckles on the bulkhead when withdrawing the log for de-weeding). We also found that this location ensures the log will not get caught by the rollers of the trailer as she is launched or recovered, although we will hopefully remember to take the precaution of removing the log prior to launching or recovering! We cut holes in the bulkhead for the compass (port side) and display for the log/echosounder (starboard).
The echosounder posed a bit more of a problem, as although Stewart had said that other types of echosounder allowed fitting under the floorboards in the cabin, the length of threaded section behind the sensor do not allow this. In order to keep the sensor as far from the engine as possible, we eventually located the sensor on the starboard side of the cabin, under the bridge deck, as far aft as possible, which meant that it was aft of, and protected by, the hose running to the starboard bilge pump. Thankfully there was no hole required here, so we will eventually glue or silicone it in place.
The next free Saturday was taken in me (hopefully) fitting all the electrics. My father and I had decided on what equipment we needed to power, and so I set to work, but found that the switch panel we had bought would not fit alongside the fibreglass starboard bulkhead where the chemical toilet fits, so we realised we would have to undertake a long job, of fitting a wooden bulkhead inside the cabin's starboard side. I taped a large sheet of paper inside the cabin, marked it to suit the profile, cut it out then jigsawed a large sheet of 3/8" marine ply to suit. After some persuasion with a surform, the shape matched the profile of the coachroof (a tricky bit) fairly closely, and the next task was to work out how to fix it to the boat. In order to prevent unsightly screws going right through the cabin bulkhead from the outside, we used wood screws through the existing holes that are used to screw the washboard bronze slider rail in place, to screw a 10mm thick strip of hardwood to the bulkhead on the inside. We then woodscrewed the ply bulkhead to the hardwood strip from the inside. With me so far? On the outboard side we glued two blocks of Araldite to the inside of the fibreglass bulkhead, and again screwed into this using brass countersunk screws through the ply bulkhead. So, this gave us a useful 10mm gap behind the bulkhead in order to run cables etc. That was a long, but very satisfying day!


The next day I decided to finally get the wiring done. I'd bought a lot of gear from Maplin including wire etc., and started with the supply from the battery. This took the form of cables through the starboard tube that contains the lanyard to keep the deck locker covers in place. In order to prevent the cables being worn, my sister wrapped the cables in Spirowrap, which is amazing stuff for holding long lengths of cable together, although it takes a while to 'unwind' on.
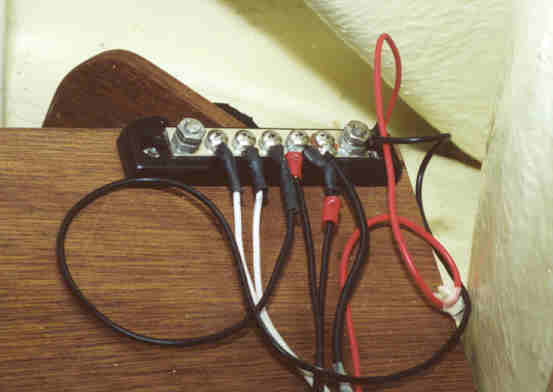
Once this was done I took off the ply bulkhead and laid it face down on the cabin seat. I ran all the wires necessary for the log/echosounder, compass light, cabin lights and cigar socket for anything that may need it, and taped it all in place. I had bought some 16x16mm trunking and self-adhesive pads to fix it in place, but as the gap behind the bulkhead was not large enough to use this, I fixed the cover of the trunking only using small screws into the ply bulkhead to tidy all the wires. I even twisted the wires where they ran in longer lengths, to prevent magnetic fields disturbing the compass. Once everything was run I soldered all the joints and applied heat shrink over each joint. This, I was told by our friendly Chandlers, is the most waterproof solution. I have discovered that I've done this job with non-tinned cable, which I hope will be sufficient, but would feel happier using tinned copped if I could get it, as it prevents the copper going green when it meets salt water. For the negative terminals, I connected them all to a stainless steel busbar, which used the crimped-type screw-down terminals, although, again upon the chandler's advice, I did not crimp but soldered the wire in place, as both crimping or screwing down directly on to the wires causes them to corrode more quickly. Finally, all the wiring was complete and I proudly lifted the bulkhead up in place. At this point I discovered that my switch panel was inverted from its original position, and we now have the delightful quirk of the used switches being at the bottom, and the spare ones being at the top!


The flush-fitting cigar socket we had bought for powering a mobile phone etc. stuck out a long way behind, and would have meant either bringing the bulkhead forward (no thanks, the cabin's small enough as it is!), or making a box sticking out from the bulkhead, which we thought would look daft. My Dad hit upon the idea of fitting it into the fiddle in the aft starboard corner of the boat, and although the original fiddle was too small, he made a new one out of hardwood, and it looks superb.

Centreboard
On the advice of a Dutch owner we had contacted through their Association, we removed the centreboard cover and discovered the winch was completely jammed with salt and oxide. We managed to remove the assembly as one, and with a combination of soaking in fresh water, a fan heater and (light!) application of a hammer, freed the shaft. We realise the cause is the reaction between the stainless steel shaft and aluminium, which all metallurgists amongst you will realise is not a good combination in sea water! The message for us is to coat this with lithium grease each year, although I understand new boats now make the winch bracket out of stainless steel.
 |
| Incidentally, our winch has a nylon strap to lift the centreboard. Older Coasters may have a wire to perform the same job - replace this if you haven't already, as a dropping centreboard may cause some damage! |
Whilst doing the winch I discovered that the centreboard case had cracked on the port side at its aft end, and applied a few layers of glass fibre tape with resin. I think a few more layers are required to keep its strength properly, as the top of the case is walked upon a lot in use. I’ve also discovered that when sailing, the case does flex somewhat when sailing in a swell, and that’s probably caused the cracking.
Cabin ventilation
Another weekend brought more hole cutting, in the shape of a 4" bronze ventilator from Classic Marine (see www.classicmarine.co.uk) which we positioned forward of the mast, again, forward of the area where extra fibreglass had been applied, and offset from the centreline to give the boat that 'traditional' look! Although the coachroof is curved here, the gap at the edge was taken up by silicone sealant, which should keep the vent waterproof! The vent runs up and down on a thread with a traditional 'tap' handle on the inside, and I'm amazed at how much light and air is let in when it is opened. We have subsequently found that there is no more condensation inside the cabin when she's left in her car park, although we plan to fit a louvre ventilator in the washboards to ensure a decent through-draught once we have fitted everything inside.

Cabin cushions
The next weekend brought the delivery of the bunk cushion sponge material, which was cut roughly to shape from a template I had drawn from another fellow Coaster owner who lives not too far from us. In fact, I needn't have bothered to make a template, as the cushions' outer edges chamfer progressively towards the bow as they meet the inside of the hull. It would have been cheaper to have ordered oblong cushions and cut the finished profile. An electric carving knife is ideal for this job, but I'd allow a few hours to do it!
My sister had chosen the material with my father, but she found that it took eight hours to stitch each cushion! Mind, she's made a lovely job of it.
The other cushion-associated job was to make the wooden infill on the starboard side, so to make the bunk the same size as the port bunk. This took a great deal of time measuring, using the centreboard casing as a centreline. I used two sheets of 3/8" marine ply which my father glued and screwed together later. He also cut out various pieces on its underside to stop it sliding either backwards, forwards or towards the centre of the boat.
Treating the spars, mast and other exterior wood
I had a happy Saturday with lovely weather tackling the mast, which took me four hours with an orbital sander and 80 grit sandpaper, to completely remove the black areas on the mast, which are caused, I have been told, by the wood oxidising where the varnish has worn away and air gets through.
The other job done by my parents, while I was happily wiring away, was to remove all the old Burgess Wood Sealer from the Iroko deck capping, that had come off in places, and re-apply it. We used 80 and 120 grit sandpaper with an orbital sander, putting masking tape over the GRP to prevent it getting sanded as well(!). The rubbed down Iroko capping looked superb, and we left it to weather for a couple of weeks to allow the surface oils to dissipate a little (as per Burgess instructions). This being done, we gave the wood a light rub down with 280 grit then applied 3 coats of Burgess Wood Sealer, which looks smashing. We had considered teak oil, but were concerned that it might make the capping slippery, and we didn't fancy the grey weathered look as an alternative.
My mother also sealed the teak cockpit grating and added a couple of coats of varnish to the spars, whose condition was OK beforehand.
Overall, the job was taking a lot of time, but on we went, dreaming of sailing through the shallow waters of the Waddenzee, for we had registered on the Dutch Association's Ascension cruise. In due course, almost everything was done. I dropped the outboard in for a service, as I didn't have the time to do it myself, and didn't fancy the idea of dropping off the gear case in order to examine the impeller, only to find that the splines were difficult to relocate.
Rigging and first sail
We got her sailed at last, the engine ran well, and she sailed very well. On the advice of Hans Vandersmissen's excellent book "The Shallow Sea Drascombe" we rigged the yard without its upper parrel bead, so enabling it to be dropped quickly into the cockpit should there be a squall. In order to bring the yard up tight against the mast when reefed, I tied a snap shackle around the yard. Now to reef, the yard is dropped into the cockpit, the halyard passed through the snap shackle, and the sail hoisted again.
We had a superb sail in light airs on Kielder on Good Friday, stopping for the obligatory pint at the Leaplish bar, then heated an enormous stew on one of the Trangia stoves we had bought.

We made our way back towards the bottom of the reservoir, stopping in an inlet to practise rowing, sculling and manoeuvring under power. She's a dream under power, and I found the easiest way to handle her at slow speed was to lift the tiller out of the way and steer using the engine alone, squatting next to it. The 9.9hp engine is perhaps a bit too powerful, lifting the bow when we twist the throttle quickly! One bonus is that it charges the battery.
On the way back to the clubhouse the fuel ran out and we ended up sailing up to the jetty, which, of course, went very smoothly, only because we did not have an audience at the time!
We tied Aquarius up and went home for the night.
On 'Silent Saturday', as my mother calls it, the wind was very strong and horizontal rain drifted past the clubhouse. We have been here before, and not wanting to spoil the memory of the previous, delightful day, we went out to the jetty to bring her onto the trailer. We'd filled the fuel can on the way to Kielder, not thinking that the old fuel in it may have been dirty. As we motored her round, suddenly the engine note lowered, and I had to use the choke to keep her going. At low revs there was no problem, but we quickly discovered that the engine was suffering fuel starvation at higher revs under load, due, we thought to dirty fuel in the tank having been stirred up by the addition of new fuel. We cast off and motored (up-wind of the jetty) at speed, trying to clear the carburettor. It didn't work, so we ended up taking her out of the water, somewhat exasperated about having to take the engine back to the service centre.
The recovery onto the trailer was very easy, and we spent the afternoon fitting the second internal brass light and clock. She looks very homely inside now.
We took her home, and the next week had the lettering fitted to bows, stern and the trailer.
The engine cam back from the service centre and was duly mounted, then off she went to Holland for a season in Friesland!
Engine woes and replacement
During 2001 Aquarius covered around 400 miles. Because of the problems experienced by the engine, which continued throughout the season, my father and I decided, with somewhat heavy hearts, to withdraw our booking on the Drascombe cruise, However, we still met in Holland for a wonderful five days’ sailing on the inland waterways, with one leg of a trip along a very blustery and choppy Isjlemeer!


At intervals, the engine continued to misbehave, and one day died as we were crossing the path of a rather large barge! Fortunately we drifted and punted our way out of danger, but it could have been very serious indeed.
The engine, although smooth as silk during normal running, continued to give problems during 2001, and the week before a cruise in the Solent and Poole harbour, gave up once more. We decided to replace it, and bought a new Mariner 6hp 4 stroke, fitted with a low pitch prop. It works very well indeed.

Future projects include fitting a port bulkhead inside the cabin, to give that ‘homely’ feel, and adding shelves to both bulkheads to hold all our paraphernalia that to date has hidden in bags. No doubt there will be several other modifications, but Aquarius, as we have named her, is now fit for the sea, and after a few days on the sand flats on Holland we felt that all the effort was worthwhile!
Adrian Langford, 2004

No comments:
Post a Comment